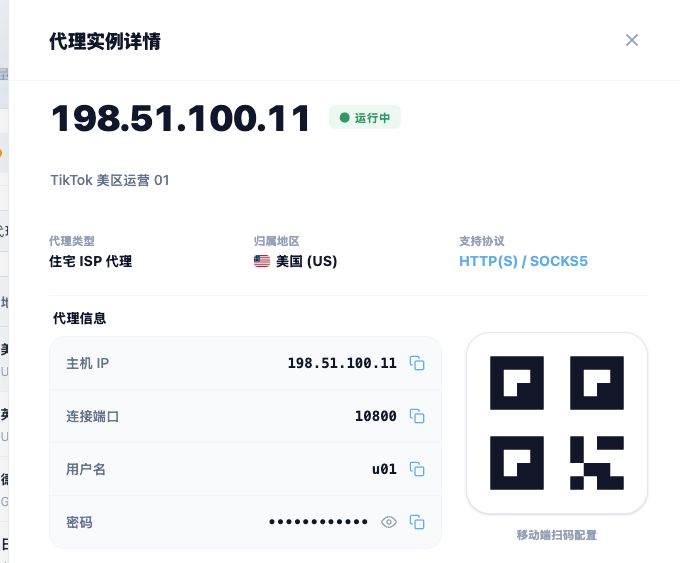
To inspect one proxy, click its exit IP in the list. A Proxy instance details drawer opens on the right, where you can verify the resource, copy connection details and view its mobile configuration QR code.
Images show the Chinese management prototype with demonstration data. Counts, IPs, amounts and dates illustrate the workflow; use your actual dashboard.
1. Click the exit IP to open details
- Find the resource in Static proxy management and click its exit IP.
- In the right-hand drawer, check the exit IP, running status, remark, proxy type and region.
- Scroll through connection details, the complete connection string and expiry information. Close the drawer with its top-right button to return to the list.
2. Understand the parameters
| Parameter | How to use it |
|---|---|
| Exit IP | Identifies and verifies the actual exit. Use the listed or exported host for connections. |
| Connection host | Use the resource’s connection IP or hostname, not an IP you select from another region. |
| Port | Use the same resource’s port instead of a client default. |
| Protocol | Choose supported HTTP or SOCKS5; an HTTPS target does not by itself determine the proxy type. |
| Proxy username and password | Use resource credentials, not your MantaProxy website sign-in. |
3. Copy individual fields or the full string
- Use the copy icons beside host IP, connection port, username or password in Proxy information.
- Use the password visibility icon if you need to verify it; configure your tool with proxy credentials.
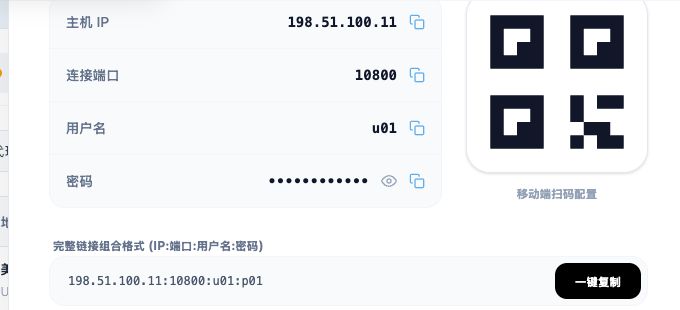
- For a complete entry, find the combined connection format, review it and choose Copy (一键复制).
- Paste separate fields in field-based tools, or the required complete format in import-capable tools. Test one proxy first.
The drawer shows IP:port:username:password. This is a combined connection entry, not a universal subscription URL. For a different required format, use the bulk export format settings.
For multiple resources, read: Copy and export proxies in bulk
4. Configure a client with the QR code
- Open the proxy-scan import function of a compatible client and scan the code from the actual resource drawer in your account.
- Review the detected protocol, host, port and authentication before saving. If the code format is unsupported, enter fields manually or import copied details.
- Verify exit IP and target-site access from that client; a successful scan alone does not confirm a working connection.
The QR code and credentials in these prototype images are illustrative and cannot be used to connect. Use your own resource’s code in your account. Protect QR codes and full strings as you would proxy passwords.
5. Authentication and authorization
Use the authentication actually provided for the resource. This guide follows username/password fields; leaving a password empty is not evidence of supported password-free access. Ask official support to confirm applicability before requesting IP whitelisting or authorization changes; do not assume an unverified dashboard control exists.
6. Protect credentials and resolve authentication issues
- Check case, spaces and line breaks when copying. Do not put passwords in remarks, public tickets or screenshots.
- Exports contain credentials; restrict access and store files securely.
- If credentials may have leaked or need changing, contact official support. This guide does not assume a self-service password reset feature.
- If credentials change, update every tool using that resource.
Related guides: Proxy management overview · Protocols and configuration FAQ · Connection troubleshooting FAQ · Purchasing, payment and expiry FAQ